23‏/06‏/2010

دهانات و ديكورات نفذت فى محافظة السويس

دهانات و ديكورات نفذت فى محافظة السويس و بأيدى أمهر من ينفذ الديكورات فى محافظة السويس،فاذا كنت من السويس وتبحث عن من يقوم بدهان شقتك ،فلا تشغل بالك كثيرا،فقط اتصل بنا و لا تتردد سنصلك فى اسرع وقت ممكن،فنحن من محافظة السويس،و ربما لم تسمع عنا من قبل ولكن شاهد أعمالنا من خلال تصفحك لموقعنا،ان أفضل من يتكلم عن الانسان هى أعماله و هى التى تعرف الناس به، و خبرتنا فى مجال الدهانات و الديكورات تمتد لأكثر من 20 عام معظمها -أعمال الدهانات-كانت فى محافظة السويس، وسابقة أعمالنا تشهد بذلك أيضا، يمكننا أيضا أن نسلمك شقتك ع المفتاح و كما يمكننا أن ننفذ لك أى مرحلة من مراحل التشطيب ،مثلا كأعمال الجبس المصيص و الفورم،المحارة،السباكة،السراميك،الكهرباء،النجارة،الأستر،النقاشة...و هى البند الأساسى بالنسبة لأعمال الديكورات بمعنى أننا نشترط ألا نقوم بأى من الأعمال السابقة دون أن نقوم بأعمال النقاشة و الدهانات و الديكورات، لكن يمكن أن نقوم بعمل الدهانات فقط لأنها بندنا الرئيسى، فاذا كنت من محافظة السويس بالأخص أو من أى المحافظات الأخرى فأتصل بنا على0126320480
سواهيلى
عامود قطيفة مع كرانيش رخامى بالجليز+ورق دهبى

حائط مقلم مع فلفت
موجة سبراتيل دهبى مع اللون النبيتى
حائط مقلم | اريهات
حجر مايكا
حائط مقلم
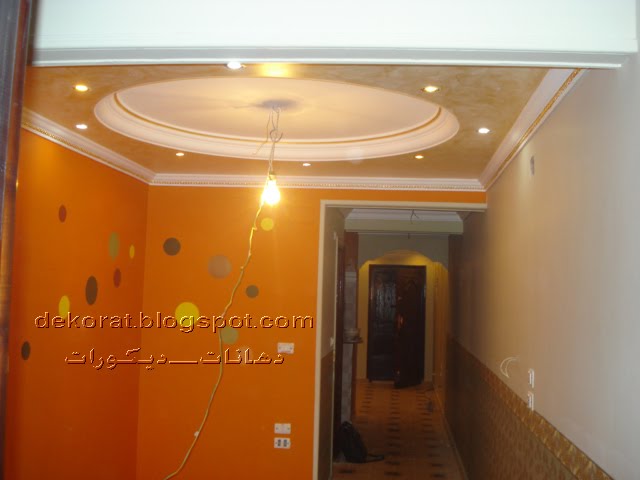
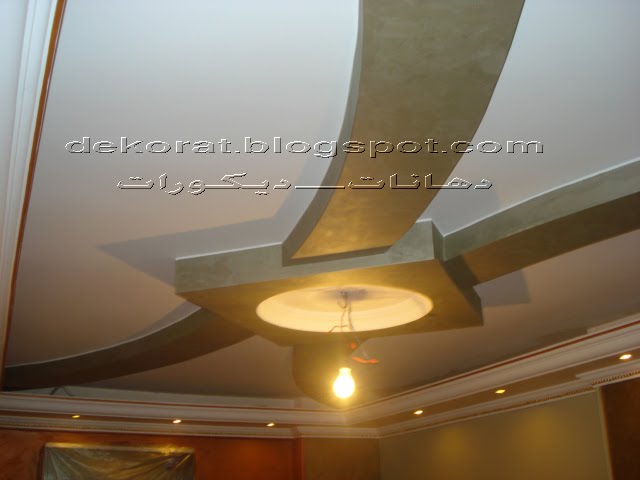
سقف بانوراما فى طرقة مع حائط باللون الاورانج |البرتقالى
إضافة تسمية توضيحية
اخضر ليمونى مع رمادى
ترخيم بالجليز مع رسم روعة
تعتيق و اكسدة فى الكرانيش
سواهيلى نبيتى ميتاليك
ترخيم عامود رخامى
حائط ديون مع سقف بانوراما-بيت نور


شوف صور لدهانات نفذناها بايدينا من هنا يا سويسى http://dekorat.blogspot.com/2009/10/blog-post.html

18‏/06‏/2010

دهانات ديكورية و تعتيق دهبى مع فلفت مع تقليمة

مجموعة صور دهانات ديكورية و تعتيق دهبى و فلفت و أريهات- حائط مقلم-
أيضا اليكم هذه الاعمال التى نفذناها و نرجو أن تنال استحسانكم و اعجابكم 
 اذا كنت من محافظة السويس أو من القاهرة أو من مدن القناة اتصل بنا وسنصلك فى اسرع وقت ممكن
0126320480
عرض الصيف من دهانات بست أرت
متوفر داخل القاهرة و مدن القناة
تعتيق دهبى

فلفت" قطيفة"


سقف ساقط، بيت نور،سقف بانوراما


تسميات:

 محافظة السويس،ديكورات السويس،دهانات السويس،تشطيب شقق،دهانات شقق
ديكورات للشقق،السويس

10‏/06‏/2010

modern paints and decor دهانات و ديكورات مودرن 2010

مع مجموعة من أفضل دهانات وديكورات مودرن للجدران و الحوائط 2010 و بأفضل أنواع الدهانات الديكورية و بالتعاون مع أفضل
شركات الدهانات باكين و نوفا كلور و الجزيرة و GLC تتوالى أعمال الدهانات الديكورية لشركة بست أرت.
واليكم مجموعة من أخر ما صممنا و نفذنا من أعمال دهانات الحائط و الجدران لعام 2010 و هى دهانات مودرن

و اذا أردت مثل هذه الدهانات المودرن فأنت و بلا شك تحتاج لنا لكى ننفذها لك هى و مئات التصاميم الاخرى
اذا كنت جاد فى البحث عن عمال دهانات و نقاشين على أعلى مستوى فاتصل بنا على 0126320480
أو عبر البريد الالكترونى seaquest20006@yahoo.com

دهان و ديكور لحائط مع رسم بسيط

09‏/06‏/2010

Interior Paint Application

Interior Paint Preparation
Introduction
You have finally decided that the color of that extra bedroom or living room probably looked good about 20 years ago, but by today's standards it leaves a lot to be desired. Where do you start? The key to an attractive and successful painting project is all in the prep work. Paint will not hide cracks and other defects in your wall surfaces.
By spending a little time preparing the room for painting, you will ensure a "professional" job that will last and look good for years to come.
Preparing a room for painting includes 3 phases - First remove things that are removable. Second, cover up things that can't be moved. Finally, make sure all surfaces are cleaned, repaired and smooth before you begin the painting process.
Preparation Learning Steps
1.  The first thing you need to do is give yourself some room to work. Move all the furniture to the center of the room or take it out altogether. Then cover the furniture with a drop cloth to protect it from dust and paint. Be sure that you remember to remove all pictures and other things that are hanging on the walls.
2.  Next, remove all electrical switch plates and receptacle plates. This includes cable TV outlets and phone jack covers.
3.  If you are planning to paint the ceiling, any electrical fixtures on the ceiling should be removed. If you have a chandelier that is supported by a post, you can just remove the cover plate so you can paint underneath it. Make sure you cover the chandelier while you paint. If you planning to paint the trim and woodwork in the room too? If so, you should remove as much hardware as you can. Remove window latches, doorknobs, etc.
4.  Now it is time to cover up things that can't be moved. Use masking tape and plastic sheets to cover receptacles, switches, radiators and other surfaces that will not be painted.
5.  If you do not plan to paint entire walls or sections of the room, you may need to mask off those areas if you are painting adjacent areas. If you have enough drop cloths, cover the entire floor. If not, you will need at least one drop cloth that you can move from section to section as you paint.
6.  Once everything is out of the way or covered, wash the walls to be painted with TSP (trisodium phosphate). This will remove dirt, dust and other substances that can prevent your new coat of paint from sticking. Wear rubber gloves to protect your hands. Wash from the bottom up to prevent streaking. Then rinse the walls with clean water and a sponge.
7.  Carefully look over the surfaces to be painted for cracks, holes and other surface imperfections that you want to smooth out. Using drywall compound, fill in holes and smooth out rough areas. If you need to patch a crack, cover the crack first with fiberglass mesh. This will help prevent the crack from returning later. Then use several thin coats of drywall compound to smooth it out. If you have major holes that need to be filled, refer to our tutorial on Patching drywall.
8.  Once the drywall compound is dry, lightly sand it smooth with a fine-grit sandpaper (150 to 200 grit). This is a very dusty step, so make sure the doors to the room are closed and you wear a comfort mask to prevent breathing in the dust. If you are planning to paint the trim and woodwork in the room, make sure you sand it first to take the sheen or gloss off the current coat of paint. Remove any loose or flaking paint and sand the edges smooth. Using wood filler, patch any holes or gouges in the woodwork. Finally, vacuum up the dust from the sanding steps. You are now ready to paint! Check out our tutorial on Painting interior rooms.